
How to Identify an Antique Wrench
A practical identification guide using wrench architecture, maker marks, measurements, patents, period documentation, and confidence levels to determine what an old wrench actually is.
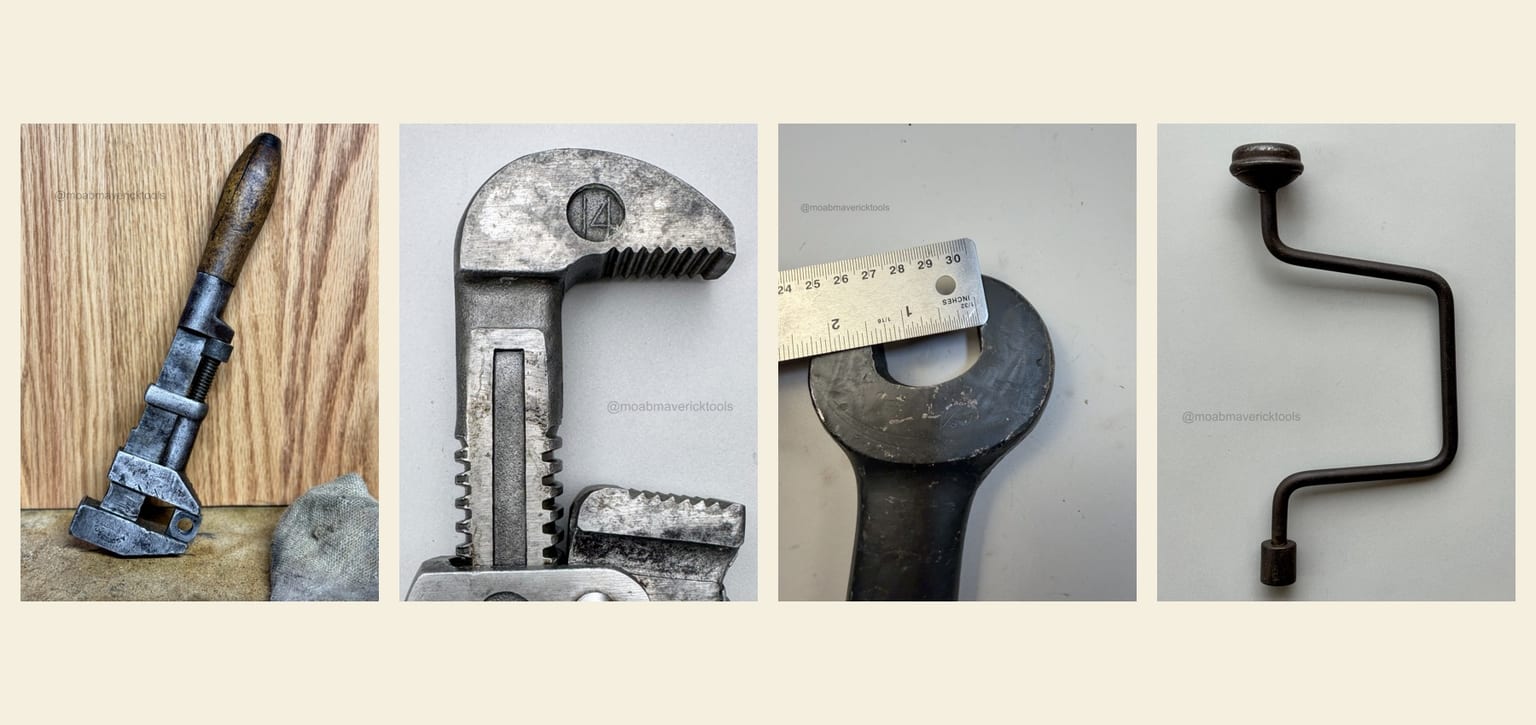
An old wrench turns up at an estate sale, in a toolbox, or at the bottom of a box of rusty tools. It may have a clear maker’s name. It may carry only a number, a patent date, or a few letters. It may have no readable markings at all.
The temptation is to begin with whatever is stamped into the steel. Sometimes that works. It can also send an identification in the wrong direction before the investigation has really begun.
A better first question is simpler:
What does the wrench itself tell you?
Cover the maker’s mark with your thumb. How far can the wrench take you without it?
The shape of the jaws, the way the movable parts are guided, the location of an adjusting screw, the form of a socket or drive, and even evidence of missing pieces can often identify the family of tool before a name is known. Marks can then refine that identification. Period catalogs, patents, manufacturer literature, and other documentary evidence can establish what the physical evidence alone cannot.
That order matters.
Physical form → markings → documentary research → dating → confidence.
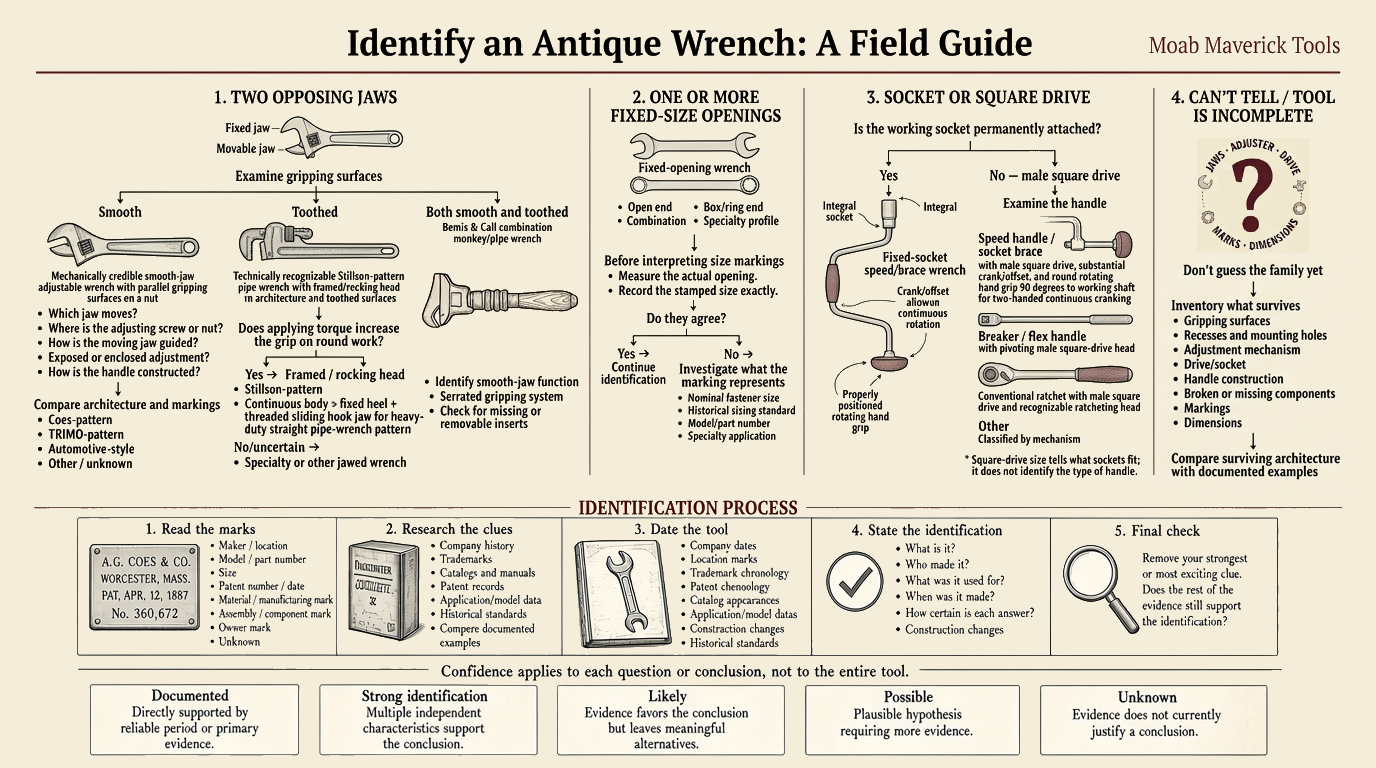
The field guide above is a compact reference. The sections below explain why those branches work and, just as importantly, where they stop.
Record What Is Actually There
Before trying to name the wrench, record it.
Measure its overall length and the dimensions that seem relevant to its working end. Photograph both sides, the jaws, adjuster, handle construction, and every mark you can find. If a stamped size appears on the tool, write down the stamp and measure the actual opening separately.
Do not translate the evidence while recording it.
If the wrench says 7/8, record 7/8. If the opening measures about 1-7/16 inches, record 1-7/16 inches. Do not quietly turn one into the other because you expect them to match.
The disagreement may be the clue.
The same rule applies to incomplete tools. A recess, empty screw hole, broken guide, or missing insert is evidence. Record what survives before deciding what ought to have been there.
First Fork: What Contacts the Work?
Most wrenches can be divided initially by the part that engages the fastener or work:
- two opposing jaws;
- one or more fixed-size openings;
- a socket or square drive; or
- an incomplete or unfamiliar working end that cannot yet be classified.
This is intentionally broad. The goal of the first pass is not to name the maker or model. It is to get into the correct mechanical family.
Two Opposing Jaws
If the tool has two opposing jaws, look next at the gripping surfaces.
Are they smooth, toothed, or does the tool provide both kinds of gripping surface?
Smooth Jaws
Smooth opposing jaws usually point toward an adjustable wrench intended primarily for nuts, bolt heads, and other flat-sided work. But adjustable wrench is only the beginning.
Look at which jaw moves. Look at where the adjusting screw or nut sits. Determine how the moving jaw is guided. Is the adjustment mechanism exposed or enclosed? Is the handle forged steel, turned wood, or made from wooden scales around an internal metal structure?
Those details can distinguish wrench patterns even when no maker’s mark survives.
Coes and the Value of Architecture
Several MMT examples illustrate this particularly well.
One A.G. Coes & Co. wrench has a turned wooden handle. A Coes Wrench Company example uses knife-handle construction, with wooden scales around the handle structure. A much larger unmarked steel wrench looks very different at first glance, yet its jaw and adjustment architecture places it strongly in the Coes-pattern family.
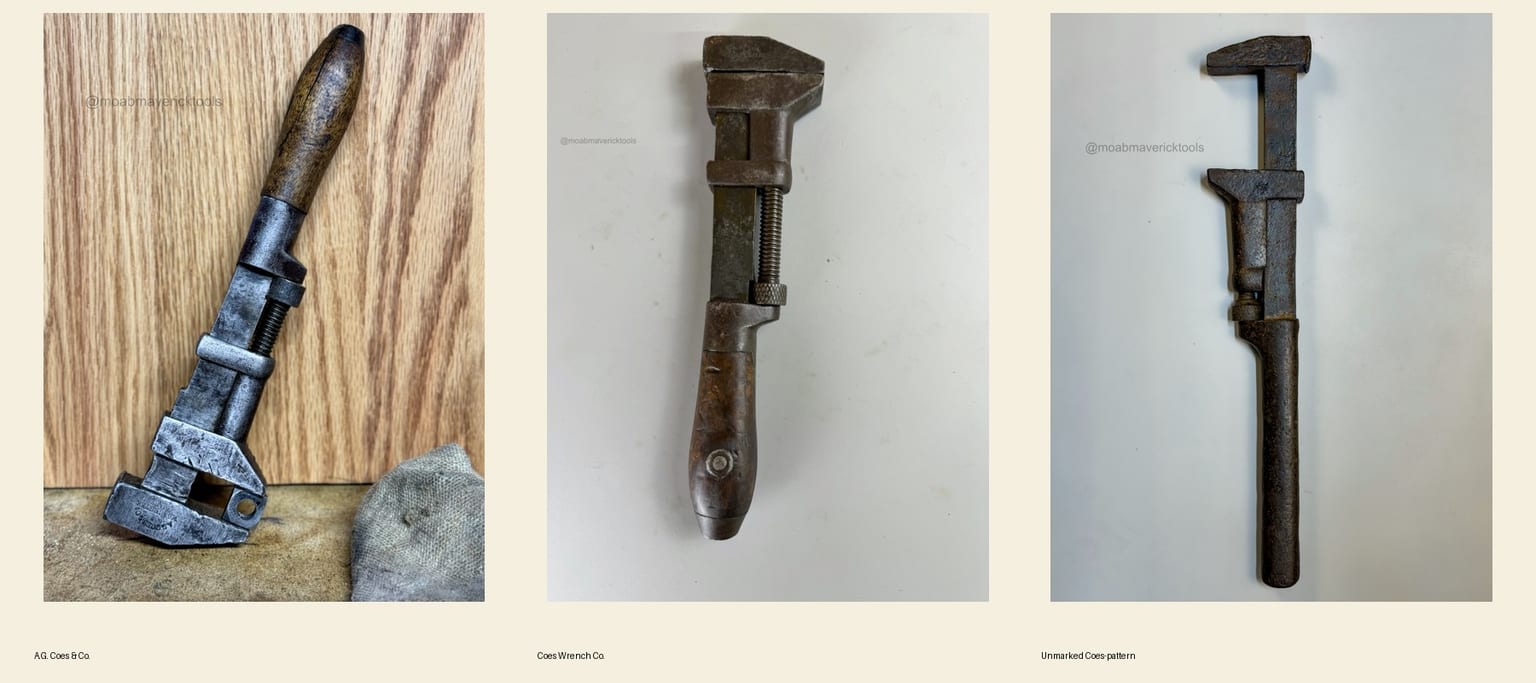
That last distinction is important. A physical pattern and a manufacturer are not necessarily the same conclusion.
For the unmarked wrench, Coes-pattern adjustable wrench is a useful identification. Made by Coes would require additional evidence.
That is not an incomplete identification. Sometimes the mechanism is all the evidence permits.
Similar Shape Does Not Establish the Same Application
Automotive-style smooth-jaw adjustable wrenches provide another useful test.
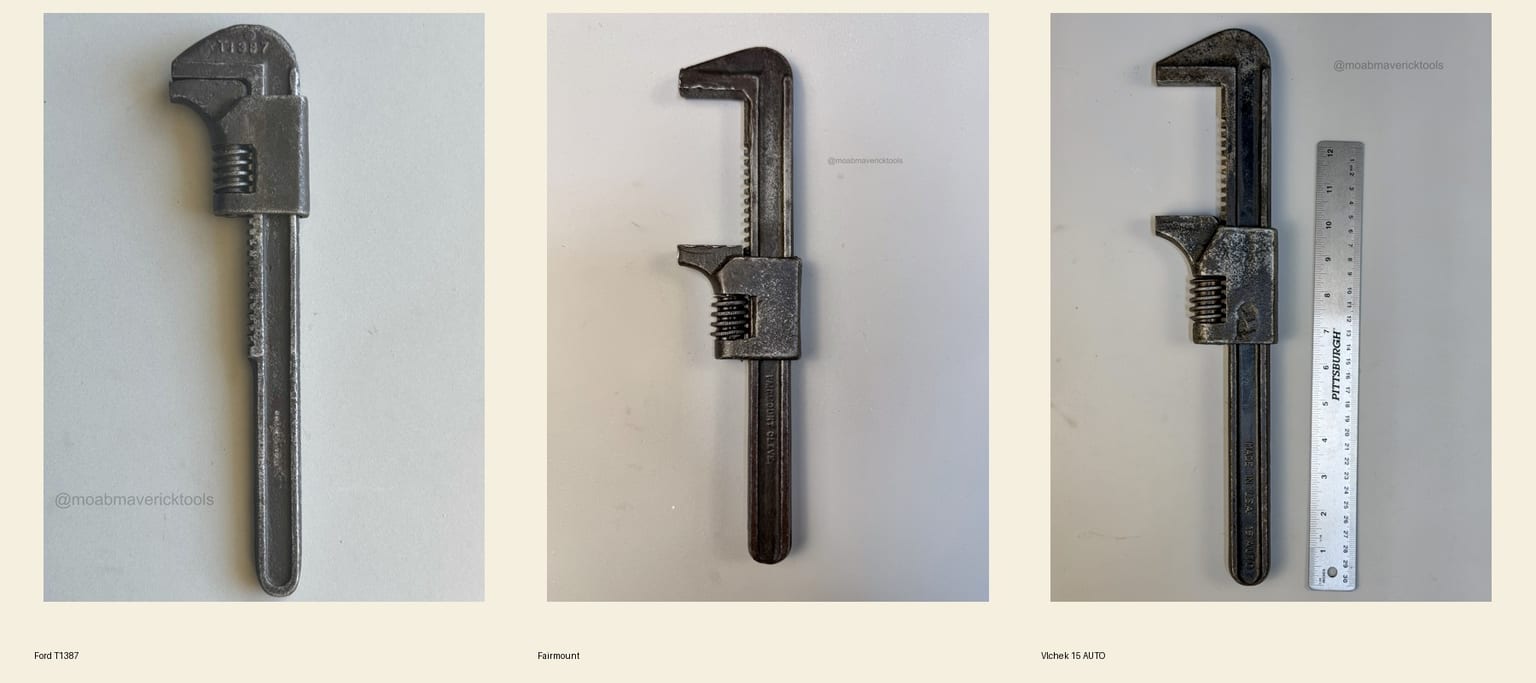
A Ford-marked wrench carrying the part number T1387 can be identified much more specifically than a superficially similar wrench. Ford’s 1920 Service Bulletin identifies T-1387 as an adjustable wrench, and Model T references document it among the tools supplied with the car.
A Fairmount wrench with similar general architecture can be identified as a Fairmount product from its maker’s mark. Fairmount was well known for automobile tool kits, but similar shape alone does not make this particular wrench a Ford factory tool.
A Vlchek wrench marked 15 AUTO gives explicit evidence of automotive context. Vlchek also made extensive automotive tooling. That still does not establish that this particular wrench was supplied by Ford.
The progression is worth remembering:
Form identifies the family. Markings refine the identity. Documentation establishes the application.
Toothed Jaws
Toothed jaws point toward gripping round work, especially pipe. The next question is mechanical:
Does applying torque make the wrench grip the work more tightly?
If so, you are probably looking at a self-tightening pipe-wrench family.
Stillson-Pattern Pipe Wrenches
Daniel C. Stillson’s 1869 patent describes the principle that became associated with his name: opposed jaws and a pivoted frame arranged to grip pipe without crushing it.
An Erie Tool Works wrench in the MMT collection shows the traditional framed, rocking-head architecture clearly.
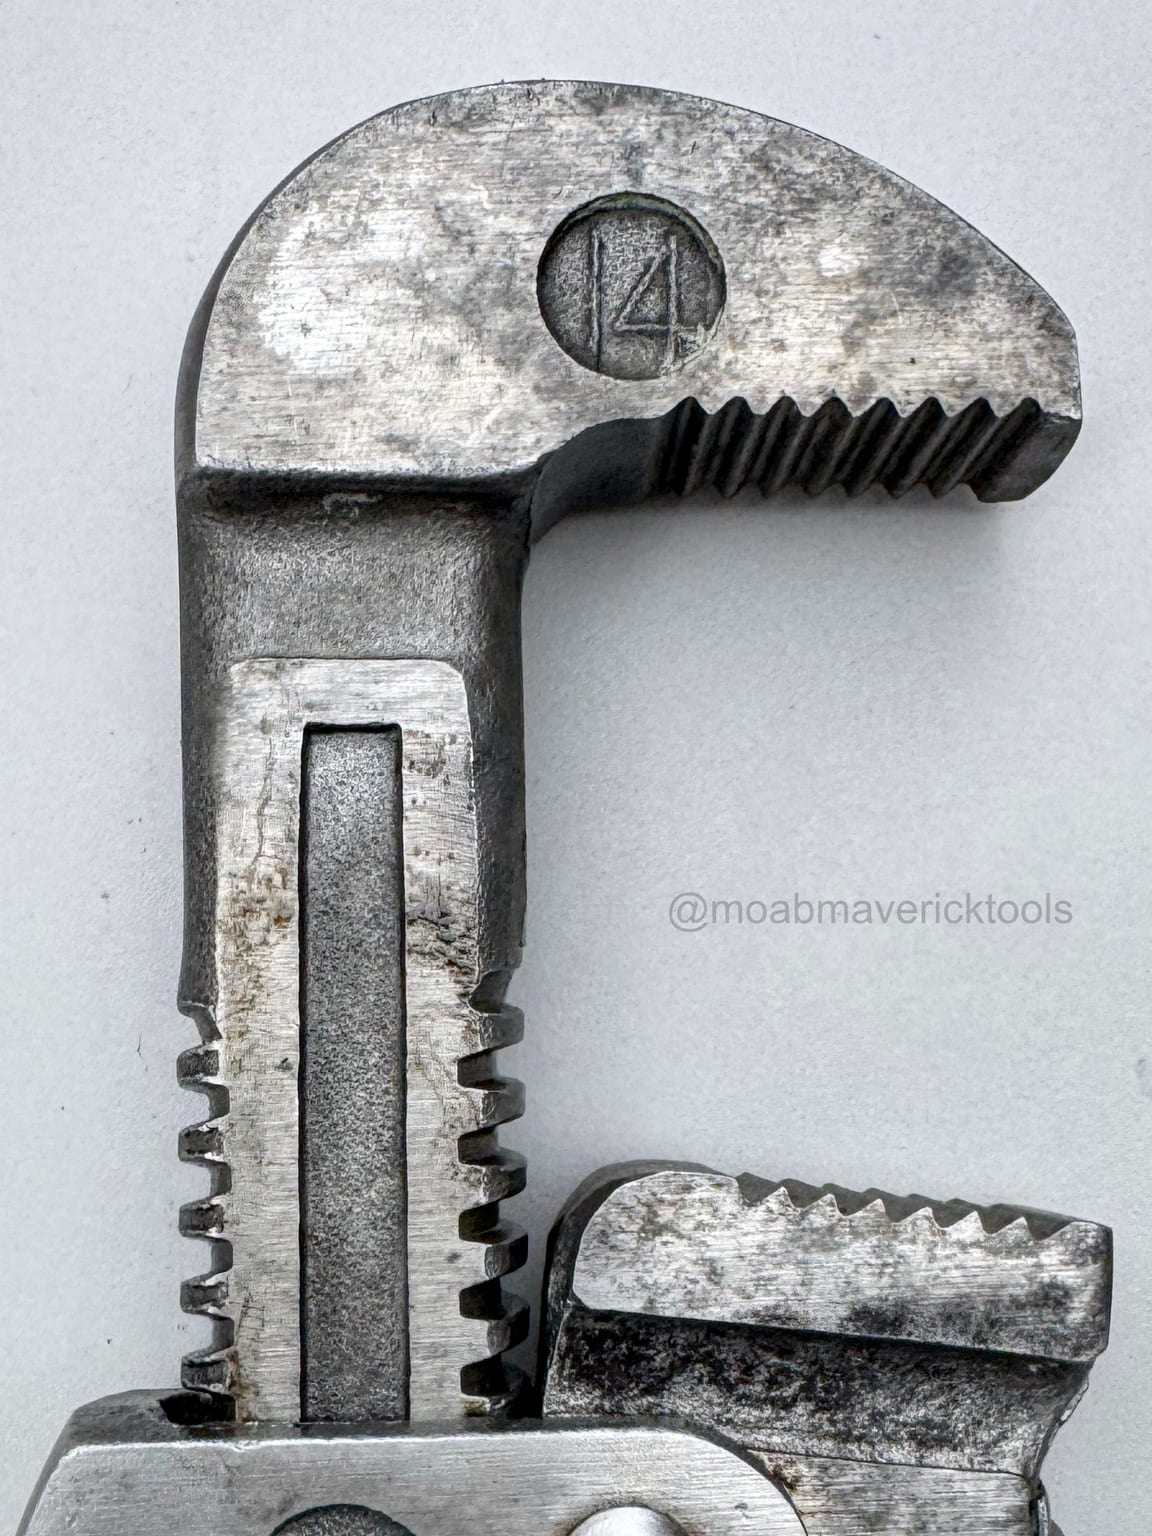
Walworth manufactured the famous Genuine Stillson wrench. Over time, Stillson became not only a product identity but a widely used name for the wrench type.
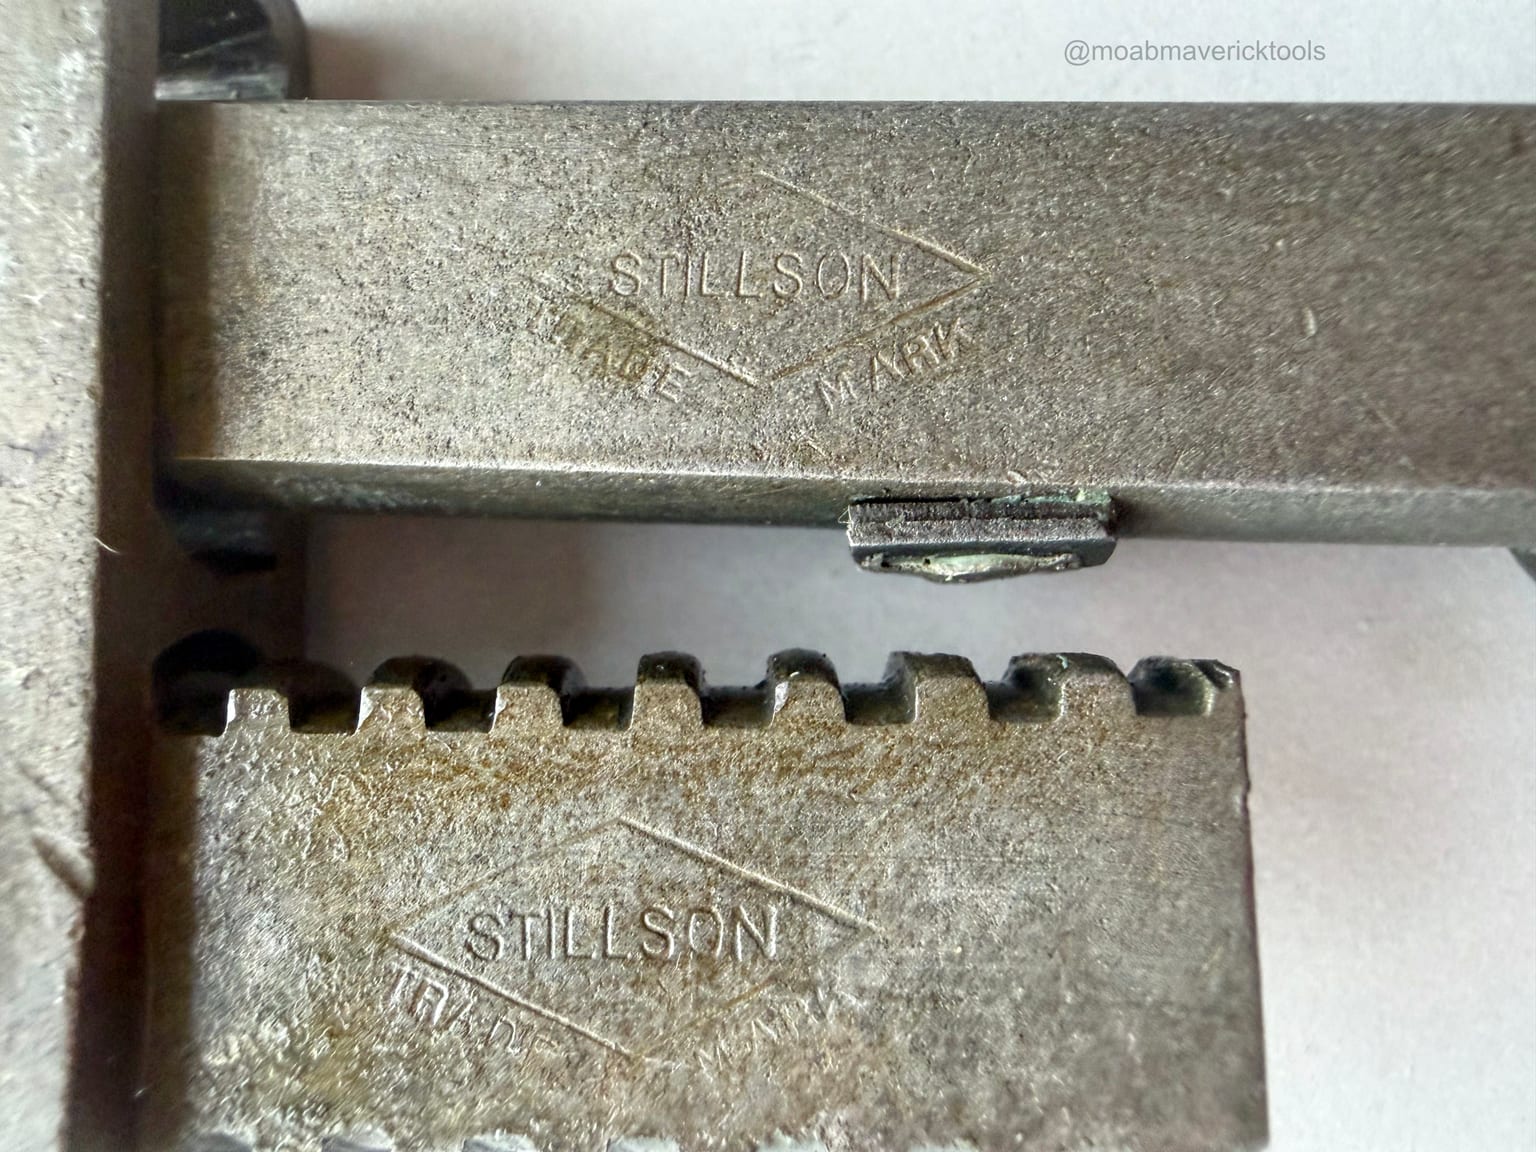
That history creates a terminology trap. Not every self-tightening pipe wrench is mechanically identical to Stillson’s original design, even when people casually call it a Stillson.
Traditional Stillson and the Heavy-Duty Straight Pipe Wrench
An Erie and a RIDGID make the distinction visible.
The Erie retains a traditional framed or rocking-head form. The RIDGID Heavy-Duty Straight Pipe Wrench uses a continuous body with a fixed heel jaw and a threaded sliding hook jaw. Ridge Tool introduced its Heavy-Duty Straight Pipe Wrench in 1923, building on the same broad self-tightening pipe-wrench principle with a different architecture.
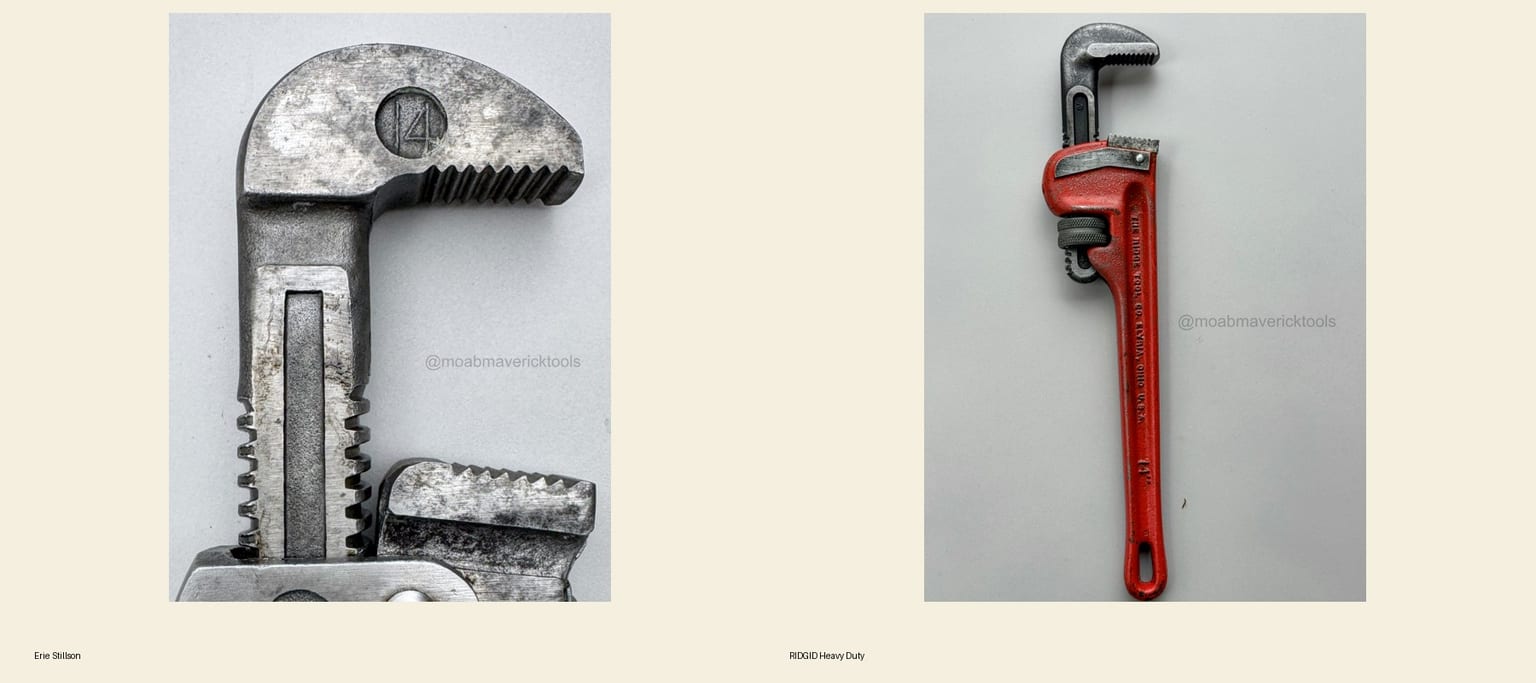
For identification purposes, start with the mechanism. Brand names come later.
Both Smooth and Toothed: Combination Wrenches
Some older adjustable wrenches were deliberately designed to do two jobs.
A Bemis & Call wrench in the MMT collection has ordinary smooth jaws for nuts and additional serrated gripping surfaces for round work. The surviving serrated system and the empty recess in the lower jaw show that a lower pipe-gripping insert is missing.
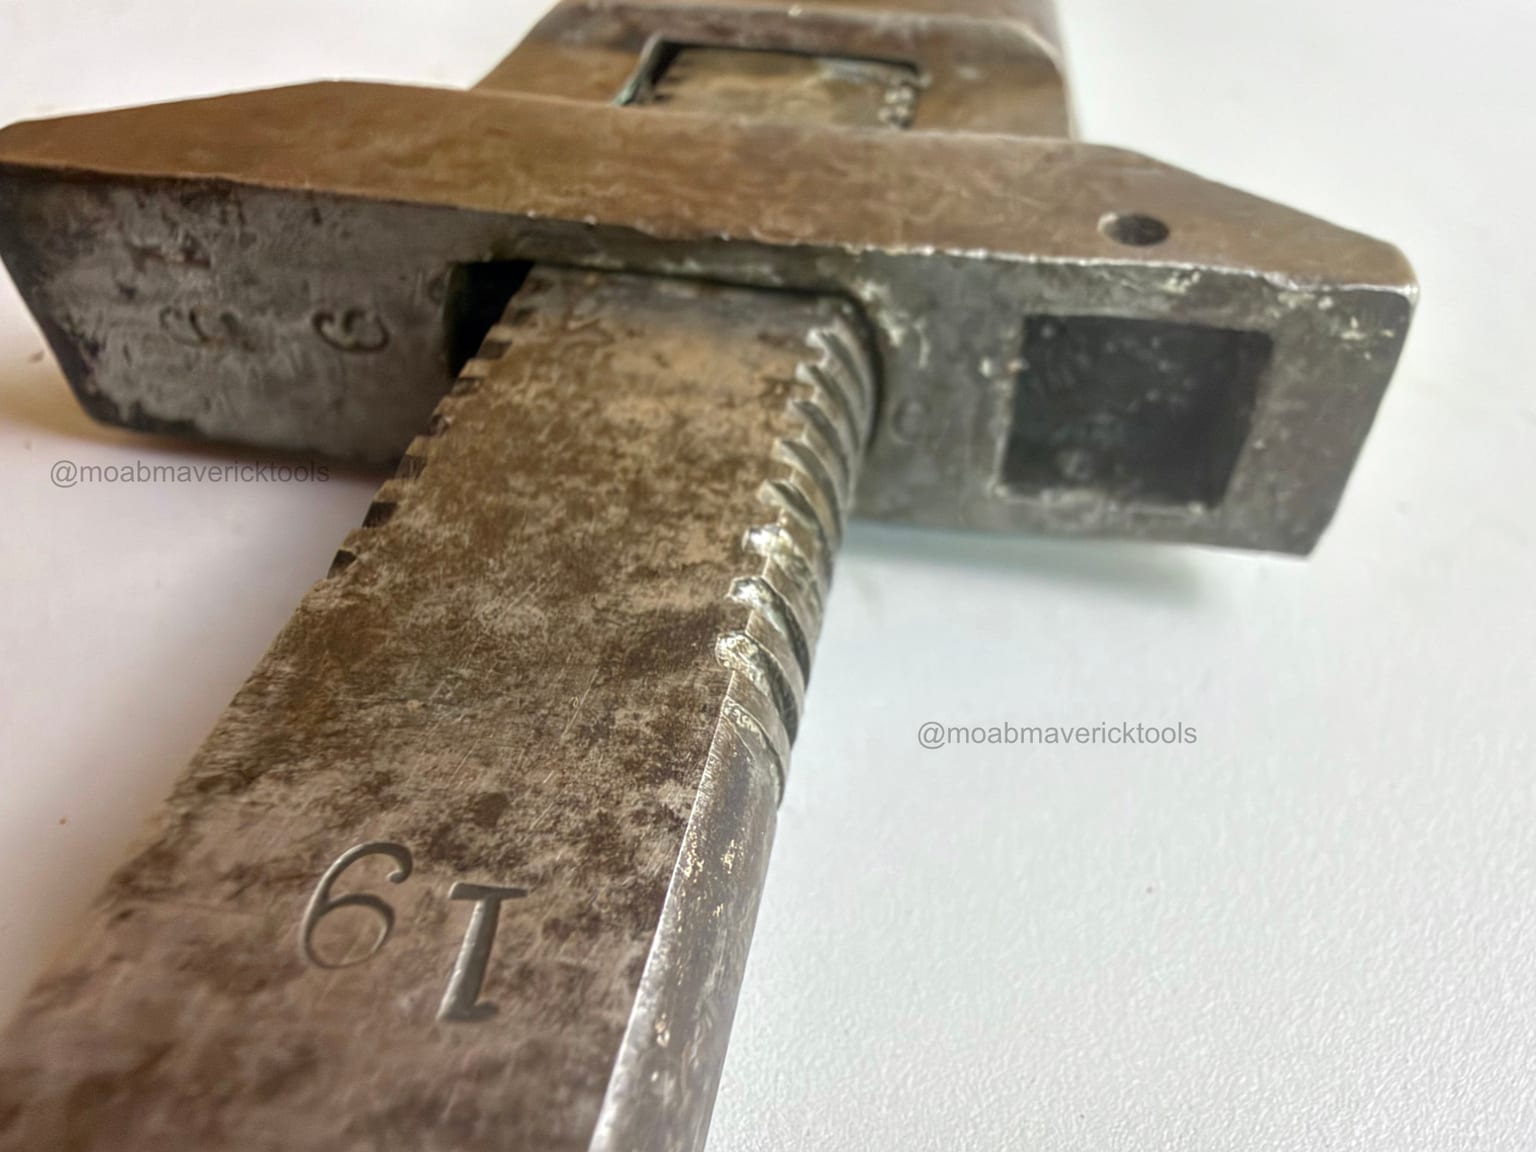
That interpretation is supported by an 1885 Amos Call patent assigned to Bemis & Call. It explicitly describes a single wrench with elements for ordinary monkey-wrench work and for gripping cylindrical objects such as pipe and round iron.
This is also a good example of why incomplete tools should not automatically be discarded as unidentified. Sometimes what is missing leaves a very informative hole.
Fixed Openings: Measure Before You Interpret
Fixed-opening wrenches seem simpler. Often they are. Historical sizing systems can still make a stamped number misleading to a modern reader.
An MMT double open-end wrench is stamped 7/8 at one end and 1 at the other. A modern assumption would be that the openings should measure 7/8 inch and 1 inch across the flats.
They do not.
The actual openings are approximately 1-7/16 inches and 1-5/8 inches.
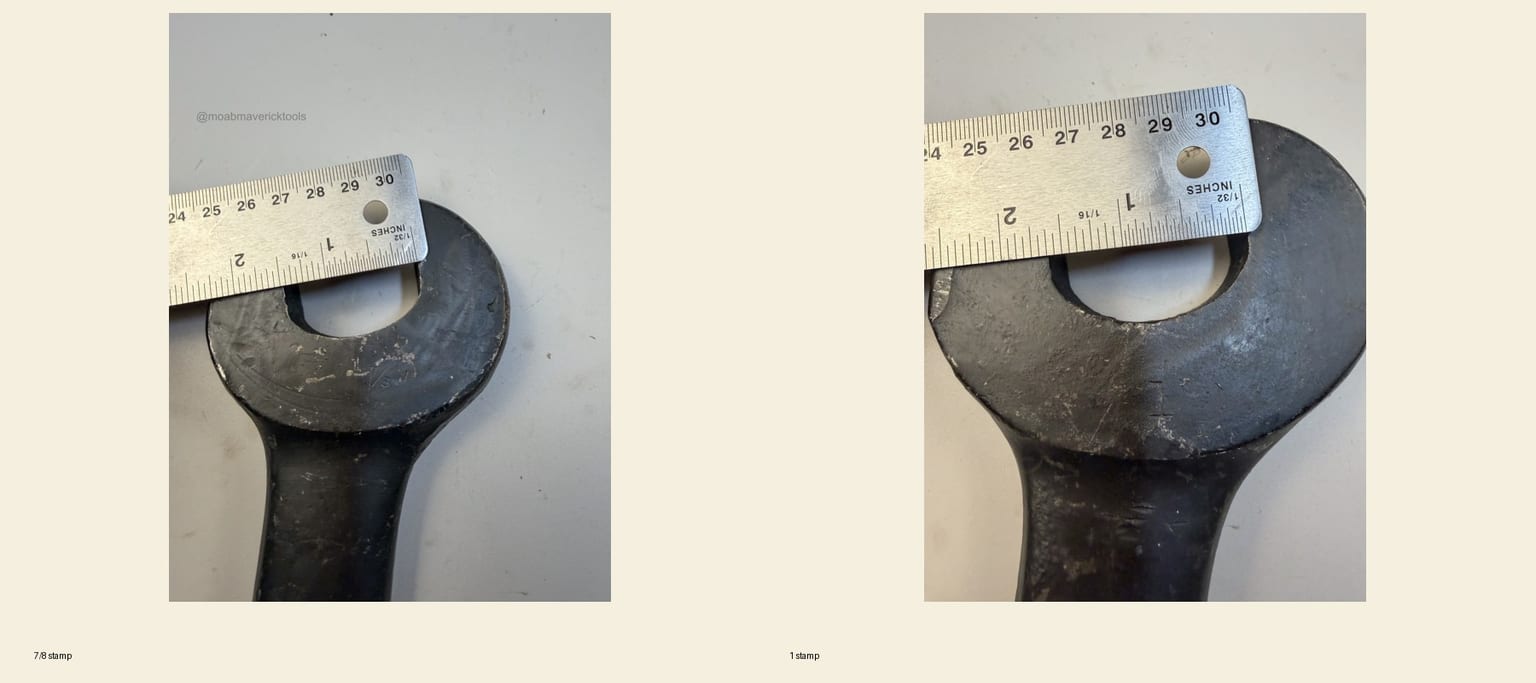
Those measurements are consistent with traditional American heavy-hex relationships in which the wrench opening is substantially larger than the nominal fastener diameter.
That does not identify the maker or exact application of this wrench. Its additional G.B. 41 marking remains unresolved.
The important identification lesson is broader: when a stamped size disagrees with the measured opening, investigate what the stamp represents before assuming the tool or measurement is wrong.
Other historical systems can create similar surprises. Whitworth sizing, for example, can label a wrench by a nominal bolt or thread size rather than by the modern across-flats dimension a reader expects. That does not make every oddly marked wrench Whitworth. It means the marking system itself may require identification.
Socket and Drive Tools: Look at the Working End
A bent handle does not automatically make something a speed wrench. A 1/2-inch square drive does not automatically make it a breaker bar.
Start at the working end.
A Walden-Worcester X1336 has a crank or brace-like form, but its working socket is integral to the tool.
A Duro-Chrome 651DK has a similar continuous-rotation purpose, but it ends in a removable 1/2-inch square drive for interchangeable sockets.
A Blackhawk 49988 has the same general socket-system concept at its working end, yet its long lever and pivoting head identify a very different function: leverage rather than rapid continuous rotation.
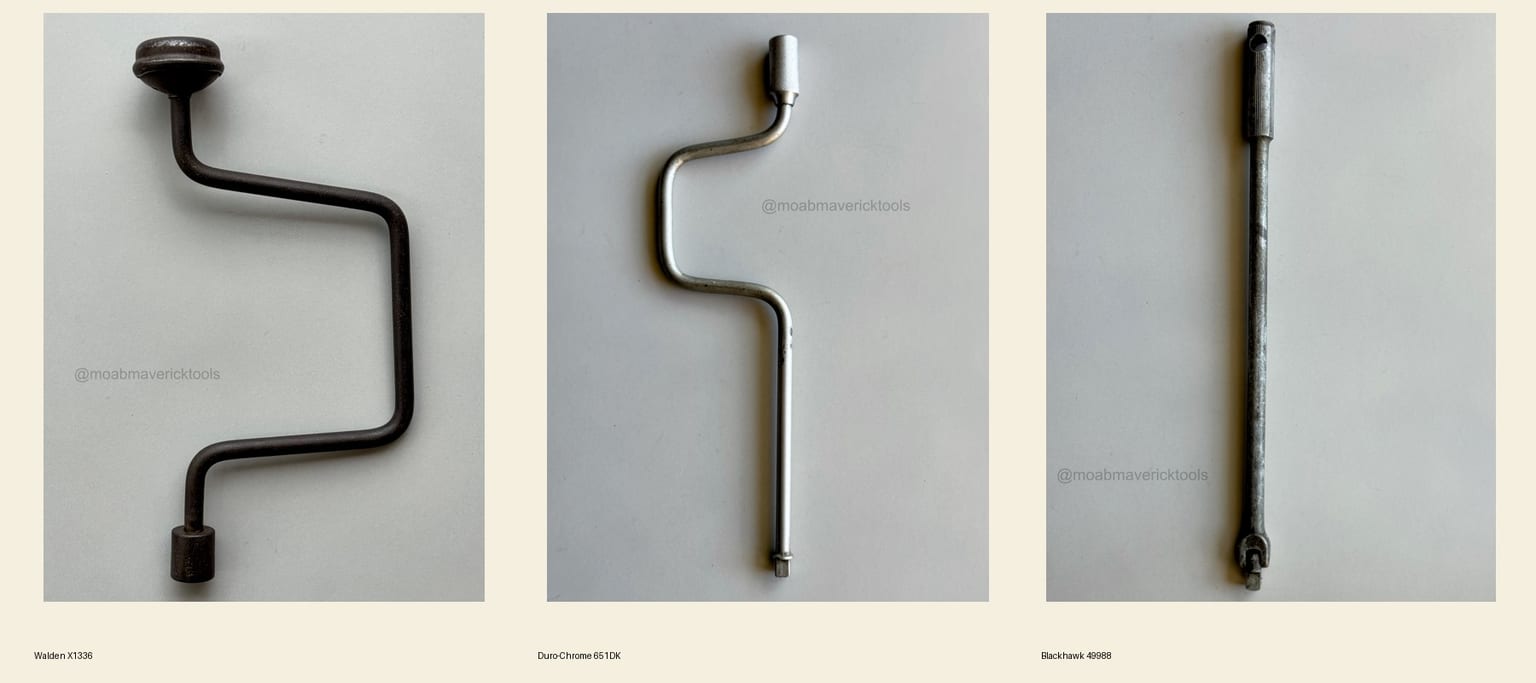
The Walden carries an October 22, 1918 patent marking. The lesson is not to assume that the stamped date invented the entire crank-wrench form. Patent markings often document a particular construction detail rather than the whole class of tool.
And square-drive size tells you what sockets fit. It does not tell you what kind of handle you are holding.
Sometimes You Are Identifying a System
A single wrench can often be approached as one mechanism. A socket set may require a different kind of reasoning.
An early automotive socket set in the MMT collection contains a fitted steel case, ratchet, extension, universal joint, cast or malleable iron sockets, pressed-steel sockets, and specialty profiles. No large maker’s name solves the puzzle at a glance.
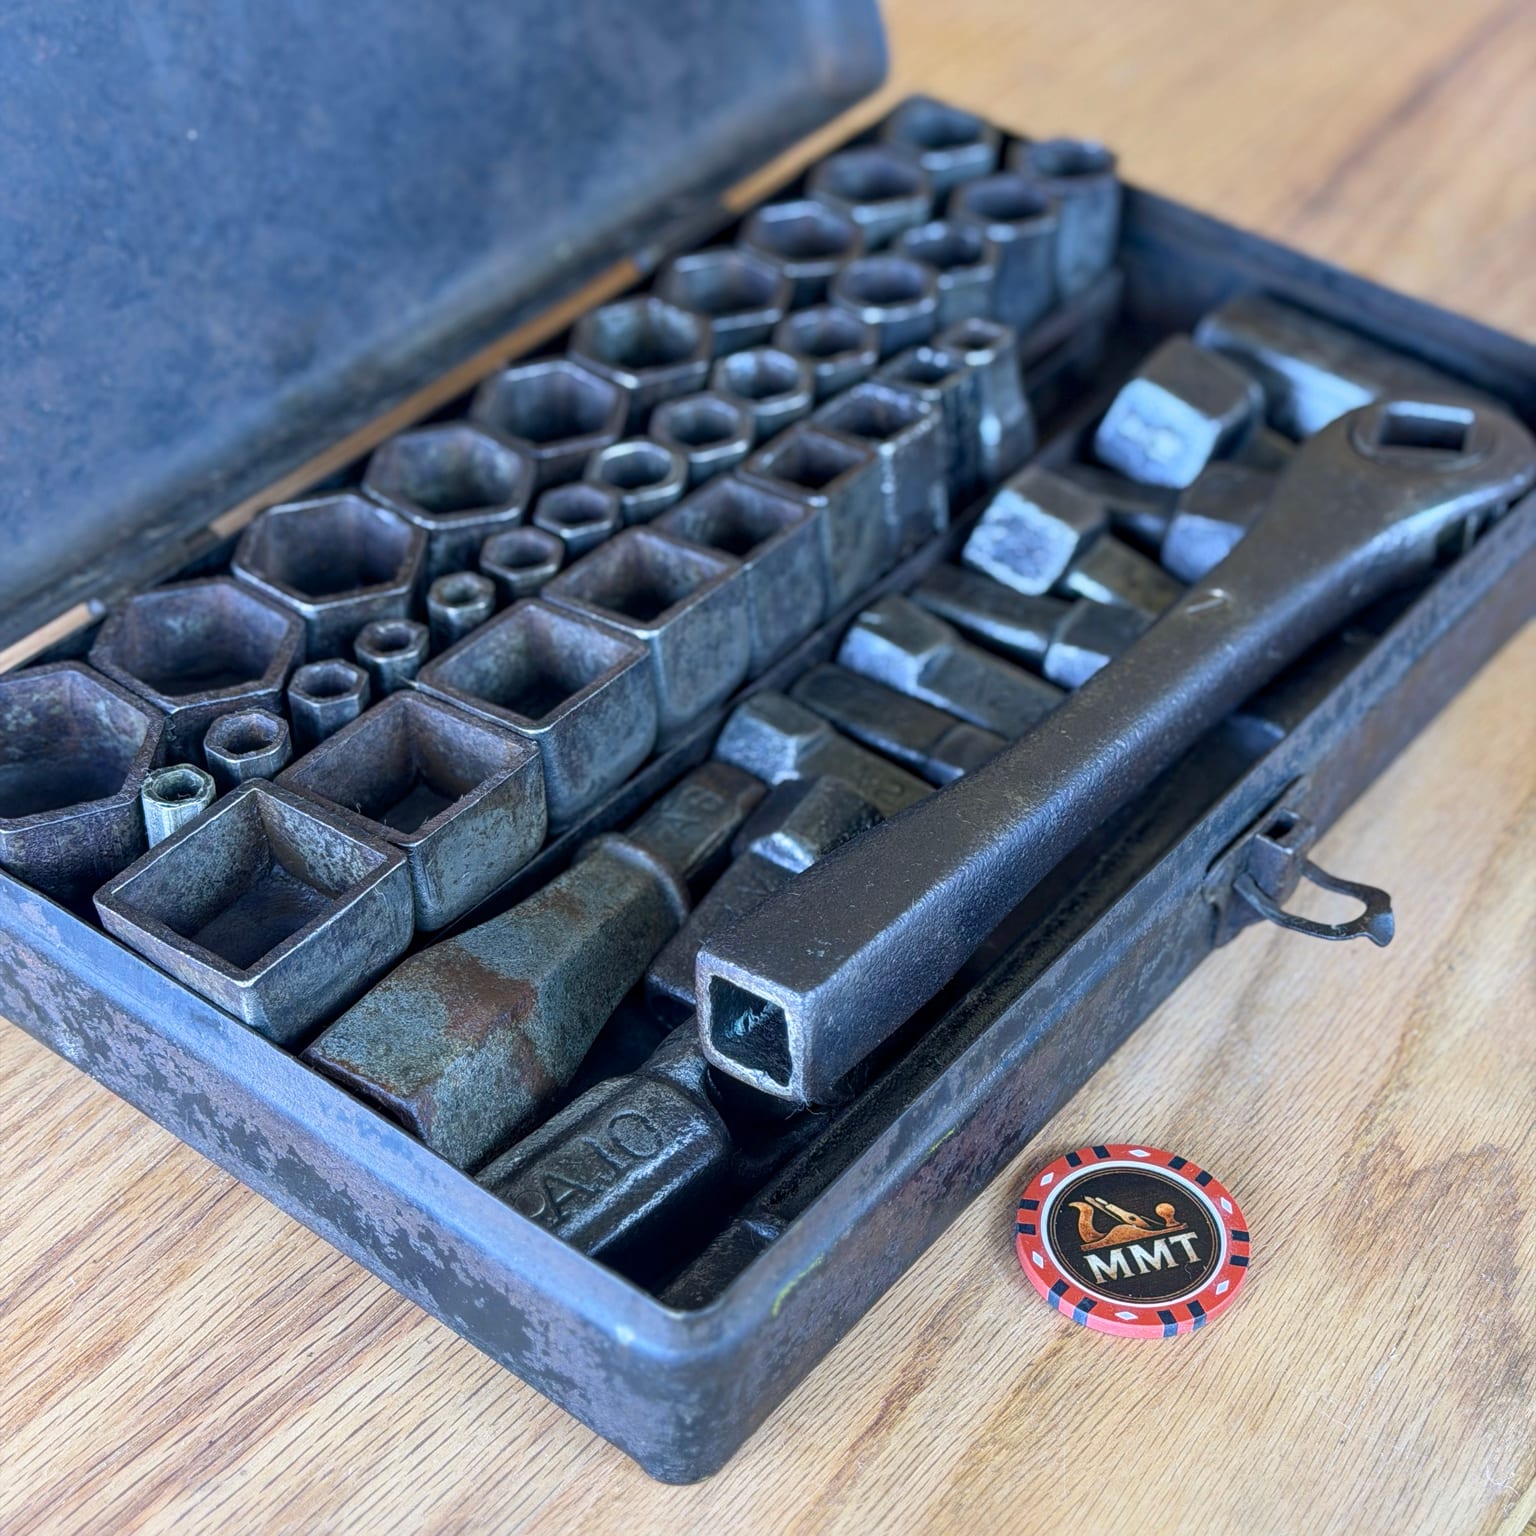
Instead, the evidence accumulates.
Chicago Manufacturing & Distributing tools are documented with cast-in A-series model numbers, and period references show the same component system in socket sets. In this set, A10, A18 through A24, A25, and A27 form a coherent group rather than a collection of unrelated numbers.
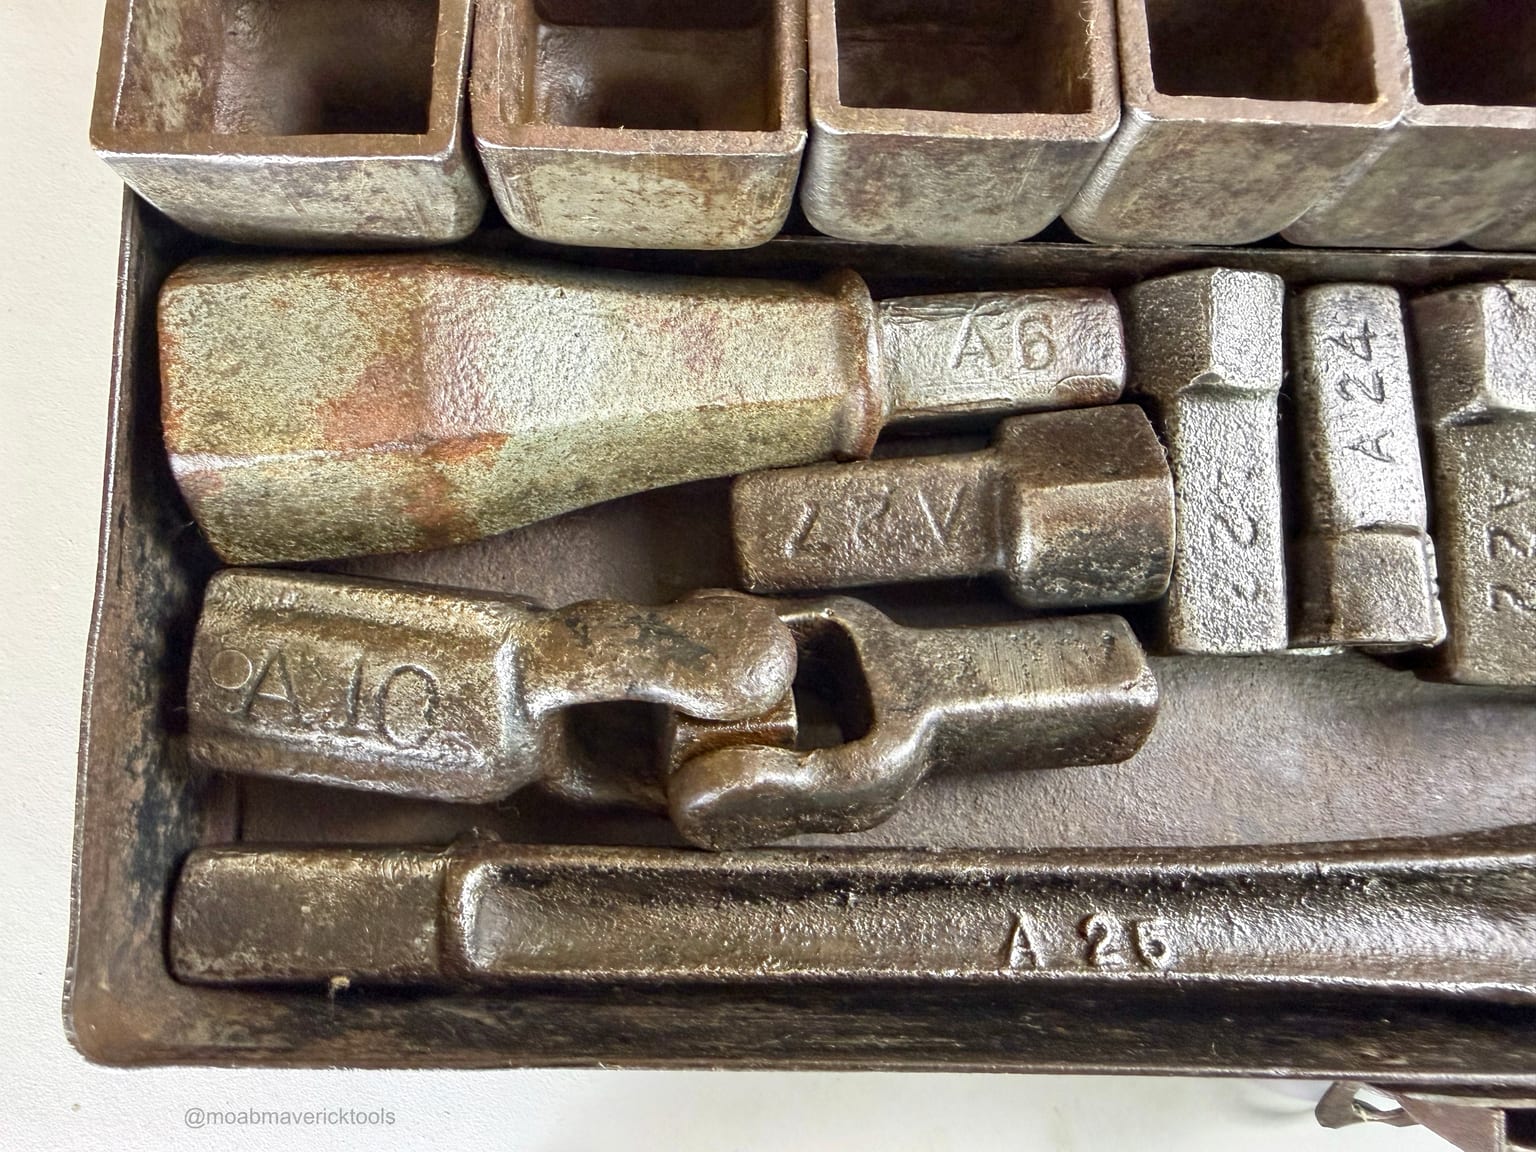
That makes the attribution of multiple components to Chicago strong.
It does not prove that every socket presently in the case belongs to one untouched factory-original configuration. Tools get replaced, lost, added, and reorganized over a century of use.
A group of individually modest clues can become powerful evidence when they form a coherent system. The conclusion still should not exceed the evidence.
Only Now Read the Marks
Once the physical family is understood, markings become much more useful.
A mark might be:
- a manufacturer or brand;
- a city or factory location;
- a model or part number;
- a size;
- a patent number or patent date;
- a material or manufacturing mark;
- an assembly or component mark;
- an owner’s name or initials; or
- something whose purpose remains unknown.
Do not require every mark to be solved before identifying the tool.
The repeated J / 9 / 19 marks on the Bemis & Call wrench, for example, appear on matching components and are consistent with an assembly or matching function. Their exact meaning remains unresolved. Solving them is not necessary to identify the wrench’s maker or combination function.
Owner marks are different again. Initials, names, punched letters, and shop marks may tell us about a tool’s working life without telling us who manufactured it.
A Name May Describe More Than One Thing
Historical tool names can drift.
Stillson began with a person and patented wrench, became strongly associated with Walworth’s commercial product, and later became a common name for a broader type of pipe wrench.
Ford wrench can be similarly troublesome. A wrench may be a documented Ford tool, a wrench intended for servicing Ford automobiles, an aftermarket tool advertised to Ford owners, or merely a style that modern sellers associate with early cars.
Brand, manufacturer, supplier, application, and modern nickname are separate questions.
Patent Dates: Extremely Useful, Frequently Misused
The TRIMO wrench is almost a perfect demonstration of why patent evidence needs to be read rather than merely copied.
An 18-inch Trimont smooth-jaw wrench carries PAT'D 12-19-1911. Its adjusting-nut guard also carries PAT'D JAN 4 1927.
At first glance, two patent dates on one wrench can look contradictory.
They are not.
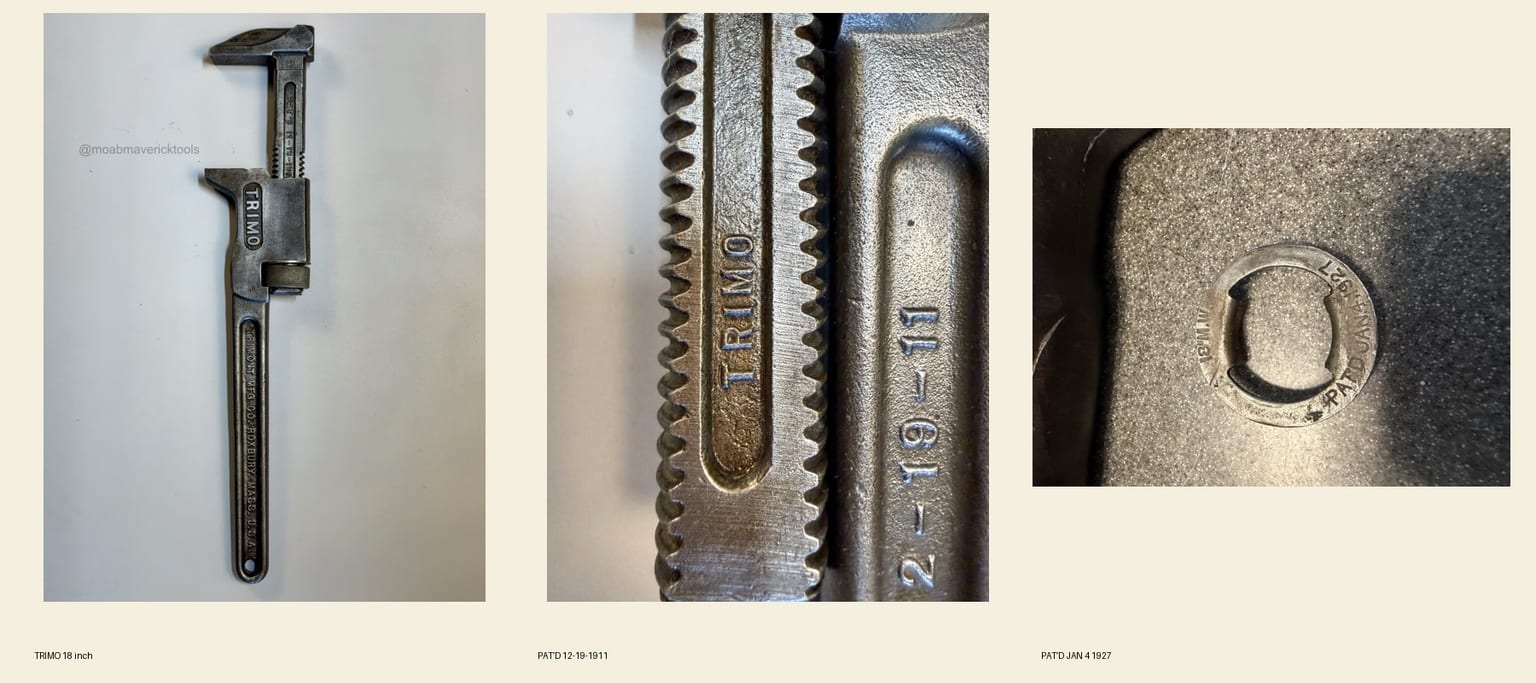
The December 19, 1911 date corresponds to U.S. Patent 1,012,037, issued to John H. Vinton and assigned to Trimont Manufacturing Company. The patent concerns guards around the adjusting nut intended to prevent accidental rotation when the nut contacts a bench or other surface.
The January 4, 1927 marking corresponds to U.S. Patent 1,613,229, issued to Joseph E. Kenerson and assigned to Trimont. That patent covers an improved removable adjusting-nut guard.
The patents do not mean that the entire wrench design was invented in either 1911 or 1927. They document particular features.
They do, however, provide chronology. If the 1927 guard is original to the assembled wrench, that configuration cannot predate 1927.
This is why patent date = manufacture date is unsafe.
When you find a patent marking:
- If there is a patent number, search the exact number.
- If there is only a date, search the date together with the maker, inventor, company, or tool type.
- Read the patent drawings and claims.
- Determine what feature the patent actually covers.
- Compare that feature with the physical tool.
- Use the patent as one dating constraint, not automatically as a manufacturing date.
PATENTED and PAT. PEND. without a number or date can still be useful, but they usually require more context from maker history, catalogs, mechanism, and other marks.
Research the Identification
Once you know the physical family and have inventoried the marks, research becomes much more efficient.
If you know the maker, look for company histories, trademark records, and period catalogs. If you have a model or part number, search the exact designation. If the tool appears automotive, look for factory parts books, owner’s manuals, accessory catalogs, and period supplier catalogs.
Patents are strongest when the physical mechanism actually matches the drawings and claims.
Period catalogs are particularly valuable because they show what a manufacturer called a tool at the time, which sizes were offered, which component numbers belonged together, and sometimes the intended trade or application.
Strong specialist references can bridge gaps, especially when they reproduce catalog material or document maker chronology. Marketplace and auction listings can be useful for discovering another example or a search term, but they should be treated as leads rather than authority.
A listing repeated fifty times is still not primary evidence.
Date the Tool Last
Collectors understandably want a date. It is often the least defensible part of an identification.
Date the tool only after you have established as much as possible about its form and identity.
Useful dating evidence includes:
- company formation, acquisition, or closure dates;
- factory-location changes;
- trademark chronology;
- patent dates;
- dated catalog appearances;
- model or vehicle application dates;
- construction changes;
- material or manufacturing changes; and
- historical fastener or sizing standards.
The result may be a year. More often it should be a range.
A Ford T1387 can be documented as a Model T tool without pretending that the part number alone identifies the exact year in which a particular surviving wrench was forged.
A RIDGID Heavy-Duty Straight Pipe Wrench belongs to a design family introduced in 1923, but that fact alone does not justify assigning a particular later example to a narrow decade.
Precision is useful only when the evidence supports it.
Four Worked Identifications
1. The Unmarked 21-Inch Adjustable Wrench
What is it? A large smooth-jaw Coes-pattern adjustable wrench.
Who made it? Unknown.
What was it used for? General adjustable-wrench work on large flat-sided fasteners or similar workpieces.
When was it made? Not established closely enough from the surviving evidence.
Confidence: Strong identification for the mechanical family; manufacturer and date unresolved.
This is the useful endpoint that collectors sometimes resist. The wrench does not need a speculative maker to be meaningfully identified.
2. Ford T1387
What is it? A smooth-jaw automotive adjustable wrench carrying Ford identification and the T1387 tool number.
Who made it? The surviving marks establish its Ford tool identity. They do not by themselves establish which outside forge or supplier, if any, produced this individual example.
What was it used for? It was part of the Model T tool complement.
When was it made? T1387 is documented through the Model T era, but the part number alone does not establish a narrow manufacturing year for this individual wrench.
Confidence: Documented Model T tool identity; narrower manufacture date unresolved.
The decisive evidence is not merely that it looks like a Ford wrench. The Ford mark, T1387 number, and period documentation agree.
3. TRIMO 18-Inch Monkey Wrench
What is it? An 18-inch smooth-jaw adjustable monkey wrench.
Who made it? Trimont Manufacturing Company, Roxbury, Massachusetts, identified directly by its markings.
What was it used for? General smooth-jaw adjustable-wrench work.
When was it made? The wrench carries a 1911 patent marking and a separate guard marked with a 1927 patent date. If the guard is original to the wrench, the assembled configuration is 1927 or later. A more precise manufacture date requires additional evidence.
Confidence: Documented maker and size; documented patented features; 1927-or-later configuration strongly supported if the guard is original; narrower date unresolved.
This is why the patent itself must be read.
4. Chicago A-Series Socket Set
What is it? An early automotive-era socket and drive-tool set containing strongly identified Chicago A-series components.
Who made it? Multiple components are strongly attributable to Chicago Manufacturing & Distributing through their A-series numbers, construction, and period documentation.
What was it used for? General automotive and mechanical service. Period retailers marketed Chicago socket sets to motorists during the Model T era.
When was it made? The component system and period documentation place the relevant Chicago tooling in the early decades of the twentieth century. The surviving set is consistent with the Model T era.
Confidence: Strong identification of multiple Chicago components; exact original factory configuration of the present case and every component is not established.
The set demonstrates a different kind of identification: no single clue has to carry the entire conclusion.
State Confidence by Question
An identification should not receive one blanket confidence rating.
You may know exactly who made a wrench while knowing very little about its date. You may identify the mechanical family strongly while having no evidence for the manufacturer. You may document an automotive application without knowing whether the tool currently sits in its original kit.
A useful vocabulary is:
Documented — directly supported by reliable period or primary evidence.
Strong identification — multiple independent characteristics support the conclusion.
Likely — the evidence favors the conclusion but leaves meaningful alternatives.
Possible — a plausible hypothesis that requires more evidence.
Unknown — the evidence does not currently justify a conclusion.
Unknown is not a failure. It is often the most accurate answer available.
The Final Check
Before settling on an identification, mentally remove the most exciting clue.
Ignore the Ford script for a moment. Ignore the patent date. Ignore the resemblance to the rare example you found online.
Does the rest of the evidence still make sense?
If the entire identification collapses when one clue disappears, confidence should probably drop.
Good identifications usually have several pieces of evidence pointing in the same direction: mechanism, construction, markings, measurements, documentary sources, and chronology.
The objective is not to produce the most specific name possible. It is to determine how much the surviving evidence actually allows you to say.
That distinction matters because old tools are historical objects as well as working ones. Their scratches, altered parts, incomplete markings, replacement components, and unresolved questions are part of the record.
Preserving a tool’s history means preserving those distinctions too.
Preserve the Patina. Preserve the evidence.